How to Design a Rooftop Solar System Under PM Surya Ghar: A Step-by-Step Guide for Installers
A practical, step-by-step guide for installers designing residential rooftop solar under PM Surya Ghar — sizing from the electricity bill, roof area, DCR modules, string and cable design, earthing, subsidy-aware proposals and the paperwork that gets approved first time.
PM Surya Ghar: Muft Bijli Yojana has turned residential rooftop solar into India's fastest-growing solar segment. By August 2026 the scheme had supported more than 5 million households and 14.8 GW of rooftop capacity, and installers were completing more than 16,000 systems a day. At that pace, the difference between a good installer and a struggling one is often the design process: getting the size, the equipment, the drawings and the proposal right the first time, so that the customer signs, the DISCOM approves and the system performs for 25 years.
This guide walks through that process step by step. It's written for installers and EPC engineers, but homeowners will find it useful for understanding what a good design should include.
The design in one paragraph
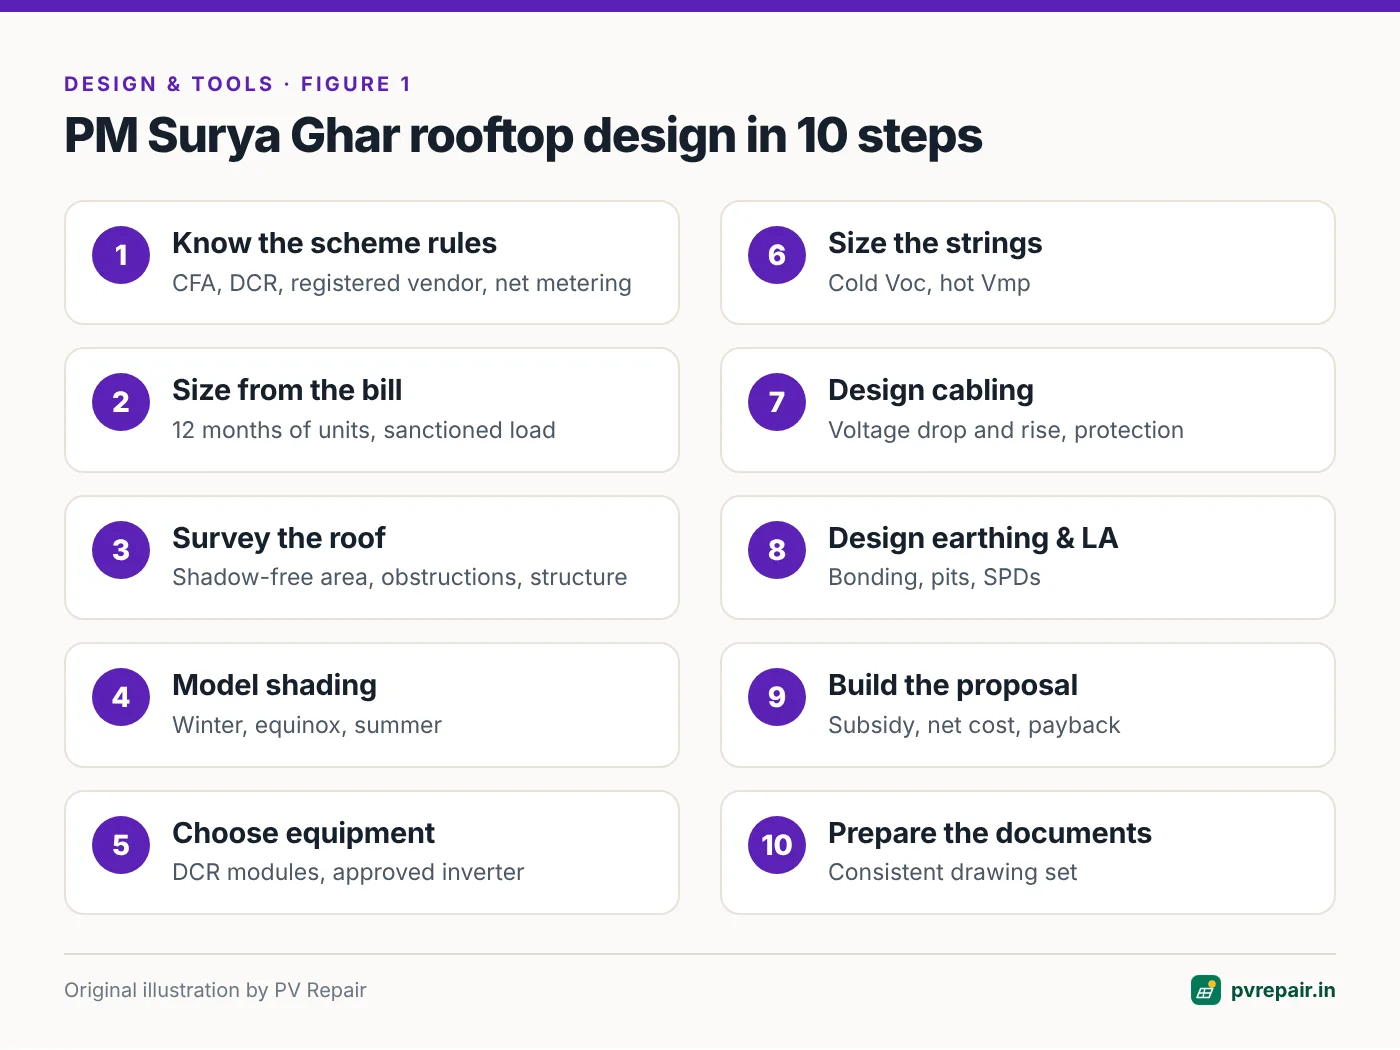
Size the system from the customer's annual consumption and sanctioned load (most scheme systems land around 3 kW), confirm about 10–12 m² of shadow-free roof per kW, use DCR-compliant modules and an approved inverter, size strings for India's temperature extremes, size cables for voltage drop and rise, design earthing and lightning protection properly, and present a proposal that shows the subsidy, net cost and payback clearly. Then submit a clean, consistent drawing set to the DISCOM.
Step 1: Understand the scheme rules that affect design
Several scheme rules shape the design directly. Always check the current guidelines on the national portal (pmsuryaghar.gov.in) and your DISCOM's instructions, because details change.
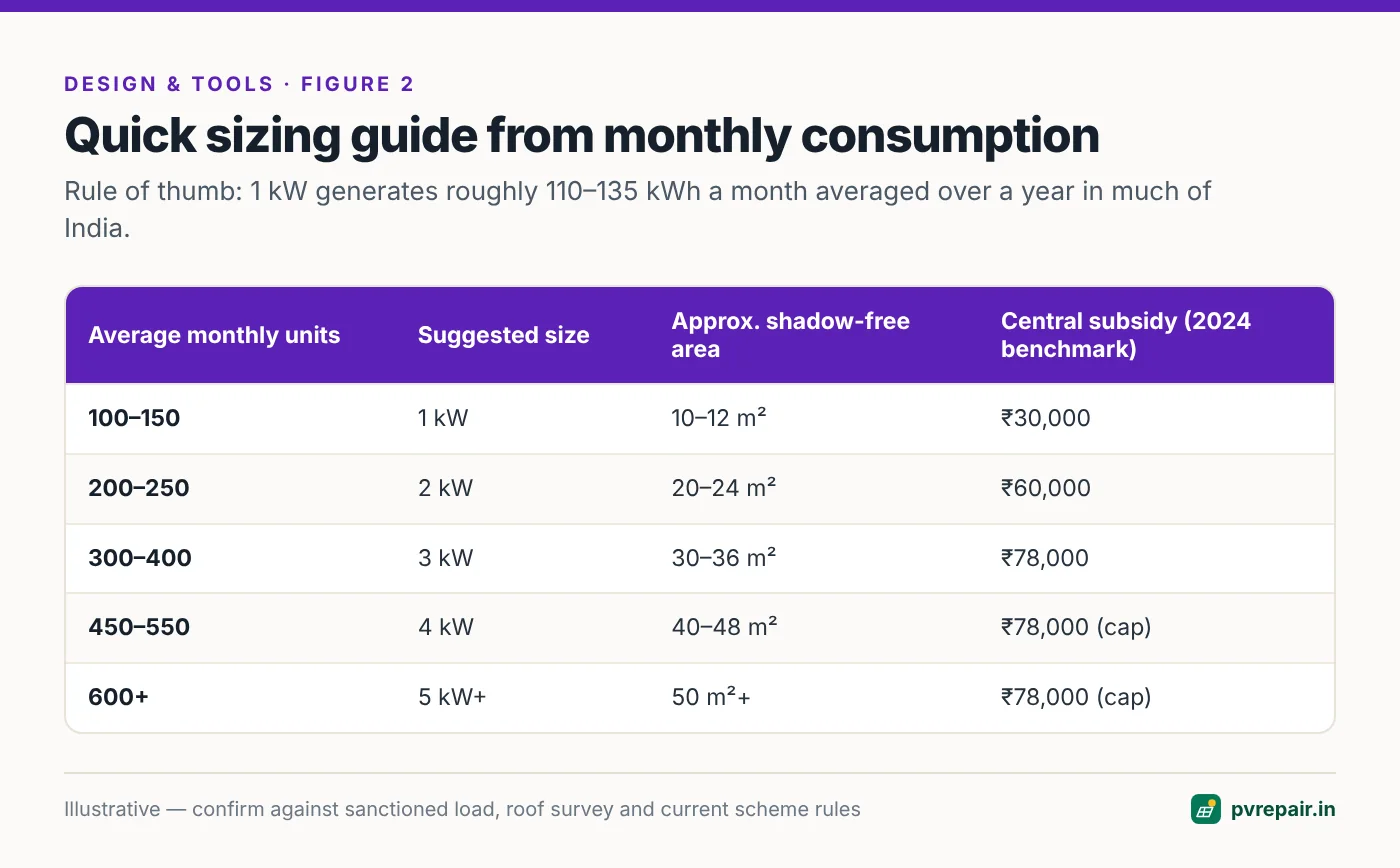
- Central financial assistance (CFA). At the benchmark prices announced in 2024, CFA was ₹30,000 for a 1 kW system, ₹60,000 for 2 kW and ₹78,000 for systems of 3 kW and above. Above 3 kW, the subsidy doesn't increase.
- Domestic content (DCR). To qualify for CFA, systems must use domestically manufactured solar modules and cells that meet the Domestic Content Requirement. A module assembled in India from imported cells may be ALMM-listed but still not DCR-compliant. (Consumers who opt out of the subsidy have had different rules — check current MNRE orders.)
- Registered vendors. Households choose an installer registered on the national portal, and the vendor's work is inspected before subsidy release.
- Net metering. The system connects through the DISCOM's net metering process, which has its own technical and documentation requirements.
Step 2: Size the system from the bill, not the roof
The right size balances what the customer uses, what the DISCOM allows and what the roof can hold.
Start with annual consumption
Ask for 12 months of electricity bills, not just one. Indian household consumption swings widely between seasons — air conditioning in summer, geysers in northern winters. Annual consumption gives a fair average.
A useful rule of thumb in much of India is that 1 kW of rooftop solar generates about 3.5–4.5 kWh per day averaged over a year, or roughly 110–135 kWh a month. So:
System size (kW) ≈ average monthly units ÷ 120
Check sanctioned load and phase
DISCOMs typically link the permitted solar capacity to the consumer's sanctioned load, and single-phase connections have practical limits on inverter size. If the ideal size exceeds what's permitted, the customer may need a load enhancement first — better to discover that at the design stage than after the application is rejected.
Consider the subsidy cap
Because CFA stops increasing at 3 kW, many households choose about 3 kW. Dividing the scheme's 14.8 GW by its 5 million households gives an average of almost exactly 3 kW. But don't size to the subsidy alone: a family using 600 units a month will be better served by a larger system, even though the extra capacity isn't subsidised.
Step 3: Survey the roof properly
A good survey prevents most later problems. Record:
- Shadow-free area. Official guidance puts the requirement at about 10–12 m² of shadow-free area per kW for a conventional flat-roof layout. Measure usable area after setbacks from parapets and edges.
- Obstructions. Water tanks, staircase rooms (mumties), solar water heaters, dish antennas, railings and neighbouring buildings — with their heights.
- Roof type and condition. RCC slab, metal sheet, or tiled; waterproofing condition; drainage paths.
- Structure preference. Many homeowners want an elevated structure so they can still use the terrace underneath. Record the clear height they need.
- Electrical details. Meter location, main distribution board, earthing, available space for the inverter, cable route lengths.
- Photos and GPS location.
Phone-based survey tools now capture all of this and feed it straight into the design, which saves re-typing and errors. Whatever method you use, take enough photos that a designer who has never seen the site can understand it.
Step 4: Model the roof and check shading through the year
Shading is the single biggest cause of disappointing generation and hotspots on Indian rooftops. The sun is high in summer and low in the south in winter, so a water tank that casts no shadow on panels in May can shade them for hours in December.
Model the roof, its obstructions and their heights, and check shading at least for the winter solstice, the equinoxes and the summer solstice — or, better, across the whole year. Then:
- Keep modules out of areas shaded during the main generation hours (roughly 9 a.m. to 3 p.m.) in winter.
- Raise an elevated structure enough to clear parapet shadows, but remember that taller structures face higher wind loads.
- Leave walkways for cleaning and maintenance — modules that can't be reached safely don't get cleaned.
You can do this with CAD and sun-path diagrams, but 3D design tools make it far faster. See our comparison of 3D solar design software for options suited to Indian EPCs.
Step 5: Choose modules and inverter
- Modules: DCR-compliant for subsidised systems, from the approved lists, with test certification as required. Note Voc, Vmp, Isc, temperature coefficients and dimensions from the datasheet.
- Inverter: an approved grid-tie (or hybrid, if the customer wants backup) inverter with the India grid profile, sized for a sensible DC/AC ratio (often around 1.0–1.2 for residential systems), and with an MPPT voltage range that suits your string design.
- Mounting structure: hot-dip galvanised or suitable corrosion-resistant steel or aluminium, designed for the site's wind speed — especially for elevated structures.
Step 6: Size the strings
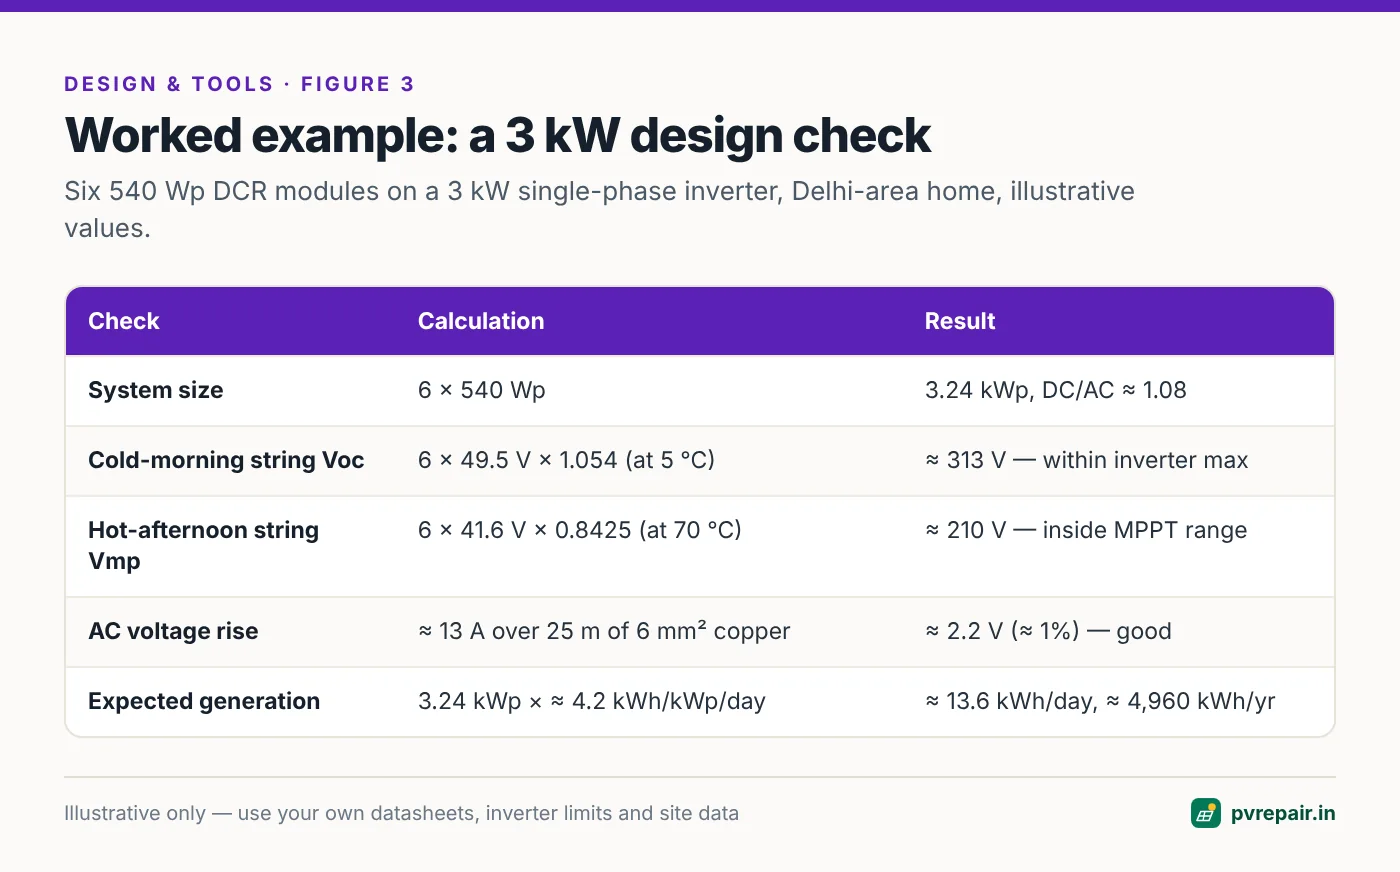
String design must keep module voltage within the inverter's limits across Indian weather:
- Cold mornings raise voltage. The string's open-circuit voltage at the site's record low temperature must stay below the inverter's maximum DC voltage.
- Hot afternoons lower voltage. The string's maximum-power voltage at high cell temperatures (often 65–70 °C on rooftops) must stay inside the MPPT range.
Use our solar string sizing calculator to check both limits, and see our PV overvoltage guide for the full method.
Step 7: Design the DC and AC cabling
- DC cables: PV-rated cable, sized for current and voltage drop, routed in UV-resistant conduit or covered trays and protected from rodents and monkeys — see our guide to rodent and bird damage.
- Connectors: matched connectors from one manufacturer, never cross-mated — see MC4 connector failures.
- AC cable: sized not just for current but for voltage rise between inverter and meter. Undersized AC cable is a leading cause of afternoon grid overvoltage trips.
Step 8: Design earthing and lightning protection
Earthing is often improvised on residential rooftops, and it shows up later as isolation faults, surge damage and safety risks. Design it:
- Bond module frames and structures properly — anodised aluminium contact isn't a bond.
- Provide earth electrodes and conductors as specified by the DISCOM and applicable standards, with inspection chambers.
- Include DC and AC surge protection devices with short leads.
- Where lightning protection is required, mount air terminals on independent supports at a safe separation distance, not bolted to the module structure.
Our guide to earthing and lightning protection mistakes covers the details.
Step 9: Build a proposal the customer understands
The proposal is where the design turns into a decision. A good residential proposal includes:
- A picture of the customer's own roof with the panels on it.
- System size, module and inverter make and model.
- Expected monthly and annual generation, with a realistic range.
- The PM Surya Ghar subsidy, any state subsidy, and the net cost.
- Estimated bill savings and payback period.
- Warranty terms and what maintenance is included.
- The installation and approval timeline.
Present generation honestly. Customers who were promised too much become low-generation complaints a year later.
Step 10: Prepare the documentation
Submit a complete, consistent file: application details, single-line diagram, site and layout drawings, equipment datasheets and certificates, and earthing details. Requirements vary by state and DISCOM, so keep a checklist per DISCOM. Our DISCOM net metering drawings checklist lists what's typically needed and the most common reasons files are sent back.
Common design mistakes we see
- Sizing from one month's bill.
- Ignoring winter shading from tanks and staircase rooms.
- Using non-DCR modules on a subsidised project.
- Strings too long for cold mornings or too short for hot afternoons.
- AC cable sized only for current.
- Earthing and lightning protection improvised on site.
- Proposals that promise generation the roof can't deliver.
- Drawings that don't match what was installed, causing inspection delays.
Tools that help
You can design PM Surya Ghar systems with spreadsheets, CAD and a sun-path chart, and many good engineers still do. The time cost adds up at scheme volumes, though, and consistency suffers when several people prepare designs, drawings and proposals separately. Browser-based Indian design tools — for example SolarDraft, Solar Designer, Arka360 and Reslink — combine roof modelling, shading, drawings and subsidy-aware proposals in one workflow. Our comparison explains how they differ and how to trial them on a real roof.
Frequently Asked Questions
What size of solar system should I install under PM Surya Ghar?
Size it from 12 months of consumption: average monthly units divided by about 120 gives a rough size in kW. Check it against sanctioned load and roof area. Many households choose around 3 kW, where the central subsidy reaches its maximum.
How much roof area is needed for a 3 kW system?
Official guidance suggests about 10–12 m² of shadow-free area per kW, so roughly 30–36 m² for 3 kW on a flat roof, after setbacks.
Do I have to use DCR modules for PM Surya Ghar?
For systems claiming central financial assistance, modules and cells must meet the Domestic Content Requirement. Check current MNRE orders for any category-specific exceptions.
What subsidy is available under PM Surya Ghar?
At the 2024 benchmark prices, central assistance was ₹30,000 for 1 kW, ₹60,000 for 2 kW and ₹78,000 for 3 kW and above. Some states add their own subsidy. Check the national portal for current figures.
How long does approval and subsidy release take?
It varies by DISCOM and state. A complete, consistent application and drawing set avoids most delays; missing documents and mismatched drawings are the most common causes of rework.
Can the system include batteries?
Yes, with a hybrid inverter, though batteries add cost and design work. Size backup from the loads that must run in a power cut and the hours needed. See our guide to lithium battery BMS errors for common issues.
Sources
- PM India, "Cabinet approves PM-Surya Ghar: Muft Bijli Yojana", February 2024 — pmindia.gov.in
- Mercom India, "PM Surya Ghar Powers 5 Million Homes, Total Capacity Hits 15 GW", 4 August 2026 — mercomindia.com
- Construction World, "MNRE allows non-DCR panels under Surya Ghar 'Give It Up'", 2026 — constructionworld.in
- Mercom India, "Unverified DCR solar modules won't be accepted in government programs" — mercomindia.com
- Press Information Bureau, rooftop solar FAQ document (shadow-free area per kWp) — pib.gov.in
- SECI, "Frequently Asked Questions" on rooftop solar — seci.co.in
- PM Surya Ghar national portal — pmsuryaghar.gov.in
Related guides
SolarDraft Review (2026): Features, Pricing, Pros and Cons for Indian Solar EPCs
An independent review of SolarDraft, the browser-based 3D solar design, proposal and CRM software for Indian EPCs — what it does well, where it falls short, what it costs, and who should choose an alternative.
Solar String Sizing Calculator for India: Cold Voc, Hot Vmp and Modules per String
Free solar string sizing calculator for Indian conditions. Enter module and inverter datasheet values to find the safe range of modules per string — checked against cold-morning Voc, hot-afternoon Vmp and inverter current limits — with the method explained.
Solar Designer Review (2026): 3D Rooftop Design, DISCOM Drawings and BOM for Indian EPCs
An independent review of Solar Designer (solardesigner.in), the browser-based 3D rooftop solar designer that produces a full drawing pack, SLD and bill of materials — strengths, limitations, and who should choose an alternative.